My Philips Internship Experience
go to day one
Well... I've reached my final year of Highschool. And with that comes a lot of projects and extra things. Like a final project, chrysostomos, school trip and of course an internship. We had to find our own place before the end of october so we could follow a 2 week internship. I've chosen for:
Koninklijke Philips In Eindhoven
I have to say: this is an amazing place to do an internship. I was provided with a testboard that they used to simulate the connection between the device and the surroundings

The team that I'll be visiting during my internship will be the connectivity group. They make the connections between the (Philips) devices and your mobile phone/the cloud. They make this ranging from toothbrushes to airfyers to connected medical devices
First Test With The Test Board
23/10/2023
It was a whole process making the board work, but after a lot of hours of work I finally managed to do it. Here is my story.
I worked with Docker to set up a virtual environment. I followed a step by step guide provided by my internship leader. The next step was to clone a GitHub repository with all the data to make projects with the test board. This took ages to clone so I took a little brake. When it was finally ready I had to build a project. But there was a secret surprise hiding in my computer. My storage! Around 3/4 of the loading it gave an error: my diskspace was full. It used literally everything it could use: There was 15MB left. It gave me the option to completely whipe my progress and start over again. After letting it load for another hour it finally finished. I tried it out that night after my swimming practice. The test programs that came with the GitHub repository worked on the board and a Led started blinking. But writing my own code was difficult. C++ is a weird language and I couldnt just compile the program. It had to be run in debug mode while the board was connected. Also C++ didn't reconize a lot of the components and didn't give usefull suggestions like other programming languages. I called it a day and took the board with me the next day to show it to my teacher and figure out how it worked.
Making The Website
30/10/2023
I thought it was a nice little extra to make a website. I had made websites in the past but mostly to play little games on. This was the first time I had to make an actual informatif website.
Making a website always starts with a homepage. I had a fun idea: write "Hello World!" in every programming language I know. I also added a fun little gimmick: when you click on the hello world text it will be copied to your clipboard.
I also made an about me page. It includes my age down to the second, my hobbies and info about my dog (I may add more later).
The next page is a page where I share my projects. I'm really excited making this and sharing my projects with the world. It will also includes links to HTML projects I've made previously.
The last page is a blog page. For now I will only use it for my blog about my Philips internship but I may add more blogs later. I will write a blog every day after my internship at Philips about my experience.
My first day at Philips
06/11/2023
Today was my first day at Philips. Let me tell you!
Yes I'm doing an internship in Eindhoven while I live in 'boerengat' Maaseik. luckily the boss of the team where I'll do my internship gives me a ride to Eindhoven. I'm befriended with his daughter and because of them I can do an internship at Philips. Big thanks to Amy and Mike! Mike is awesome and it was a fun ride to Eindhoven. He also has a cool car! The Philips building was big! It is situated in the High-Tech-Campus. An area with a lot of major tech companies. We took some tea and went to his office. He explained how the team works and what they do.
I was introduced to my internship leader Rob. He was the only one in the office. The rest of the team worked from home. I met some of them shortly online. We started by making a Git repository for my small little project. Of course I can't work straight away with the projects they do: they are way too complicated! We imported the opensource software they have created for the test board. After some trail and error we finally managed to do it. We tried the debug led and it worked! Then I learned how to print info to the boards terminal. I couldn't just access it on my computer. I had to download a serial terminal application that communicates with the board to read it's datalines. To make it simple:
"I write data from my computer to a testboard with a program to then read the data from the testboard to my computer with a program"That is it basically...
I tried figuring out how the timer function works. So to put it simple: when the microcontroller starts, it will start counting the uptime in milliseconds. You could use this to make a button that you have to hold for 1 second:
You save the time when the button is pressed and save the current time. By subtracting these 2 you will get the time that the button is on hold (basic time calculations)I couldn't finish it today so tomorrow is another day!
It was cool seeing how a team works in an office and how it exactly works. I will also be working with a small robot that I'll be controlling with a mobile app!
Day 2 (I'm really not that creative)
07/11/2023
Today, I was too late... But I can blame traffic. Traffic is the only downsight of my internship, it is a 1 hour drive (if you're lucky).
Today I finished my code that I was working on yesterday. Rob showed me an easier way of doing it. I explained yesterday how I did it but I didn't know the package they use at Philips has that feature built in. It is good that I first try my own implementation of the problem before using easier tools made by other people.
Rob brought the robot with him and showed me how it worked shortly. He wrote a quick sloppy code to check if the components worked. Now my task is to write a better, more readable and safer code. We are thinking of controlling the robot with a mobile app. If I want to do that I'll have to visit the mobile app department (they sit next to us). But before we can do that we first have to finish the code
We also got a lesson about the difference between pointers and refferences in C++. I've also learned the difference between i++ and ++i:
by doing i++ it will first return the value of i and then it will add 1 to i
++i will first add 1 to i and then return the value of i (with the 1 added)
So to sum it up:
let's say we have a var "number" with the value 1
number++ --> return "number" and add 1 to "number" after
++number --> add 1 to "number" and return "number" after
I'll remember this the rest of my life!
To end this day I had made a binary counter that uses the 3 built in leds on the test board.
It can count from 0 to 7 (8 bits --> 1 byte)!
Tomorrow is a Wednesday but I still have to work from 8 to 5 so I'll miss my swimming practice :(
A longer Wednesday than normal
08/11/2023
To be honest, the day passed like a speed train. But normally on Wednesday I have actual interesting classes.
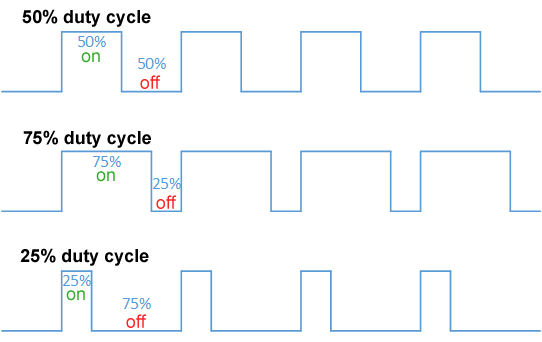
So... yesterday I was too late and today I was too early. But that doesn't matter because I can do more work. Today I started with the code from yesterday. We had to finalize the unit tests and finish the shiftregister. After that we had to make a PWM controller. The basic principle:
With a PWM you can adjust the speed of a DC motor. Usually you can only turn it on and off. But by using a Pulse Width Modulation you can send pulses over the DC line. The wider the pulses the higher motor will turn. An image_me for more info:
Rob also showed me how they build software in the test pyramid which is a unique experience for me. Then we worked on the PWM code. It is a lot of work to test this code with the unit tests because this is directly based on the clock of the board itself. We finished it and put a general code in the Main.cpp. We hooked it up to the robot and... Nothing! After some checking we found out that we missed a part of the code that we had to copy (rookie mistake!). We fixed it and... Nothing! We hooked up an expensive testing kit to a test board to check the PWM output. Well... It did nothing.
After some digging we found out that there was a small problem in the code. Something we
missed that was acutally really dumb. But not from us; from the manufacturers of the
shiftregister.
To initialize the shiftregister we made a function to turn the
shiftregister "on". We did this with -> enable.Set(true); because true = on
= high = 1 = ...
You know what I mean. Well the manufacturers had the amazing idea to
turn the shiftregister on by setting the enable pin to false!. I don't know
which guy thought he was funny at the Texas Instruments office but I will find you!
So
luckily the robot worked after this. Next up we had to write implementations and I had to
write a MOCK for the implemented codes. I also managed to crash Visual Studio Code... Don't
ask me how I did that!
That was it for today!
4th day!
09/11/2023
Today we worked on the MotorShieldController. This will make it easier to configure and run the motors.
I'm starting to understand C++ and it's syntax more and more. I still have some issues understanding the Test Units.
So for today, the MotorShieldController was a big task. We had to make it so that the motors can be controlled by changing its speed and direction. But It wasn't that straight forward: the motors weren't setup easy on the pins:
The shiftregister works on 1 byte (or 8 bit where each bit could be either 1 or 0) which is 00000000
And to set one motor 'high' we have make the bit high. So in theory if we want the first motor to spin left we set the shiftregister to 00000001 (bits count backwards). But that wasn't the case. Spin motor 1 left was on bit 2, spin 2 right was on bit 3. The full list:
#define MOTOR4_A 0 0
#define MOTOR2_A 1 0
#define MOTOR1_A 2 0
#define MOTOR1_B 3 0
#define MOTOR2_B 4 0
#define MOTOR3_A 5 0
#define MOTOR4_B 6 1
#define MOTOR3_B 7 1
(motor A is left, motor B is right).
So I can up with the idea to config the motors in a map (dictionary in python) and put the motor name as it's own enum and an array of the 2 pins (index 0 for left and index 1 for right). Now we could easily modify the speed and direction. After some bugfixing we made the test work.
Tomorrow we will work on connecting the robot to my smartphone using BLE (Bluetooth Low Energy) used in the Connectivity group. Then I'll finally do the things they do on my department!
The end of the first week
10/11/2023
This week passed really fast! I'll tell you what I did today and give a short recap of this week.
I started with another layer on the code for the robot. This code was a little bit more specific than the previous one. The previous layer doens't specify the amount of motor's. We now have left motor en right motor and we can easily control them. Rob worked on the BLE for the robot. It can now advertise (make itself known to other BLE devices that it is available on the network) and my phone can find it.
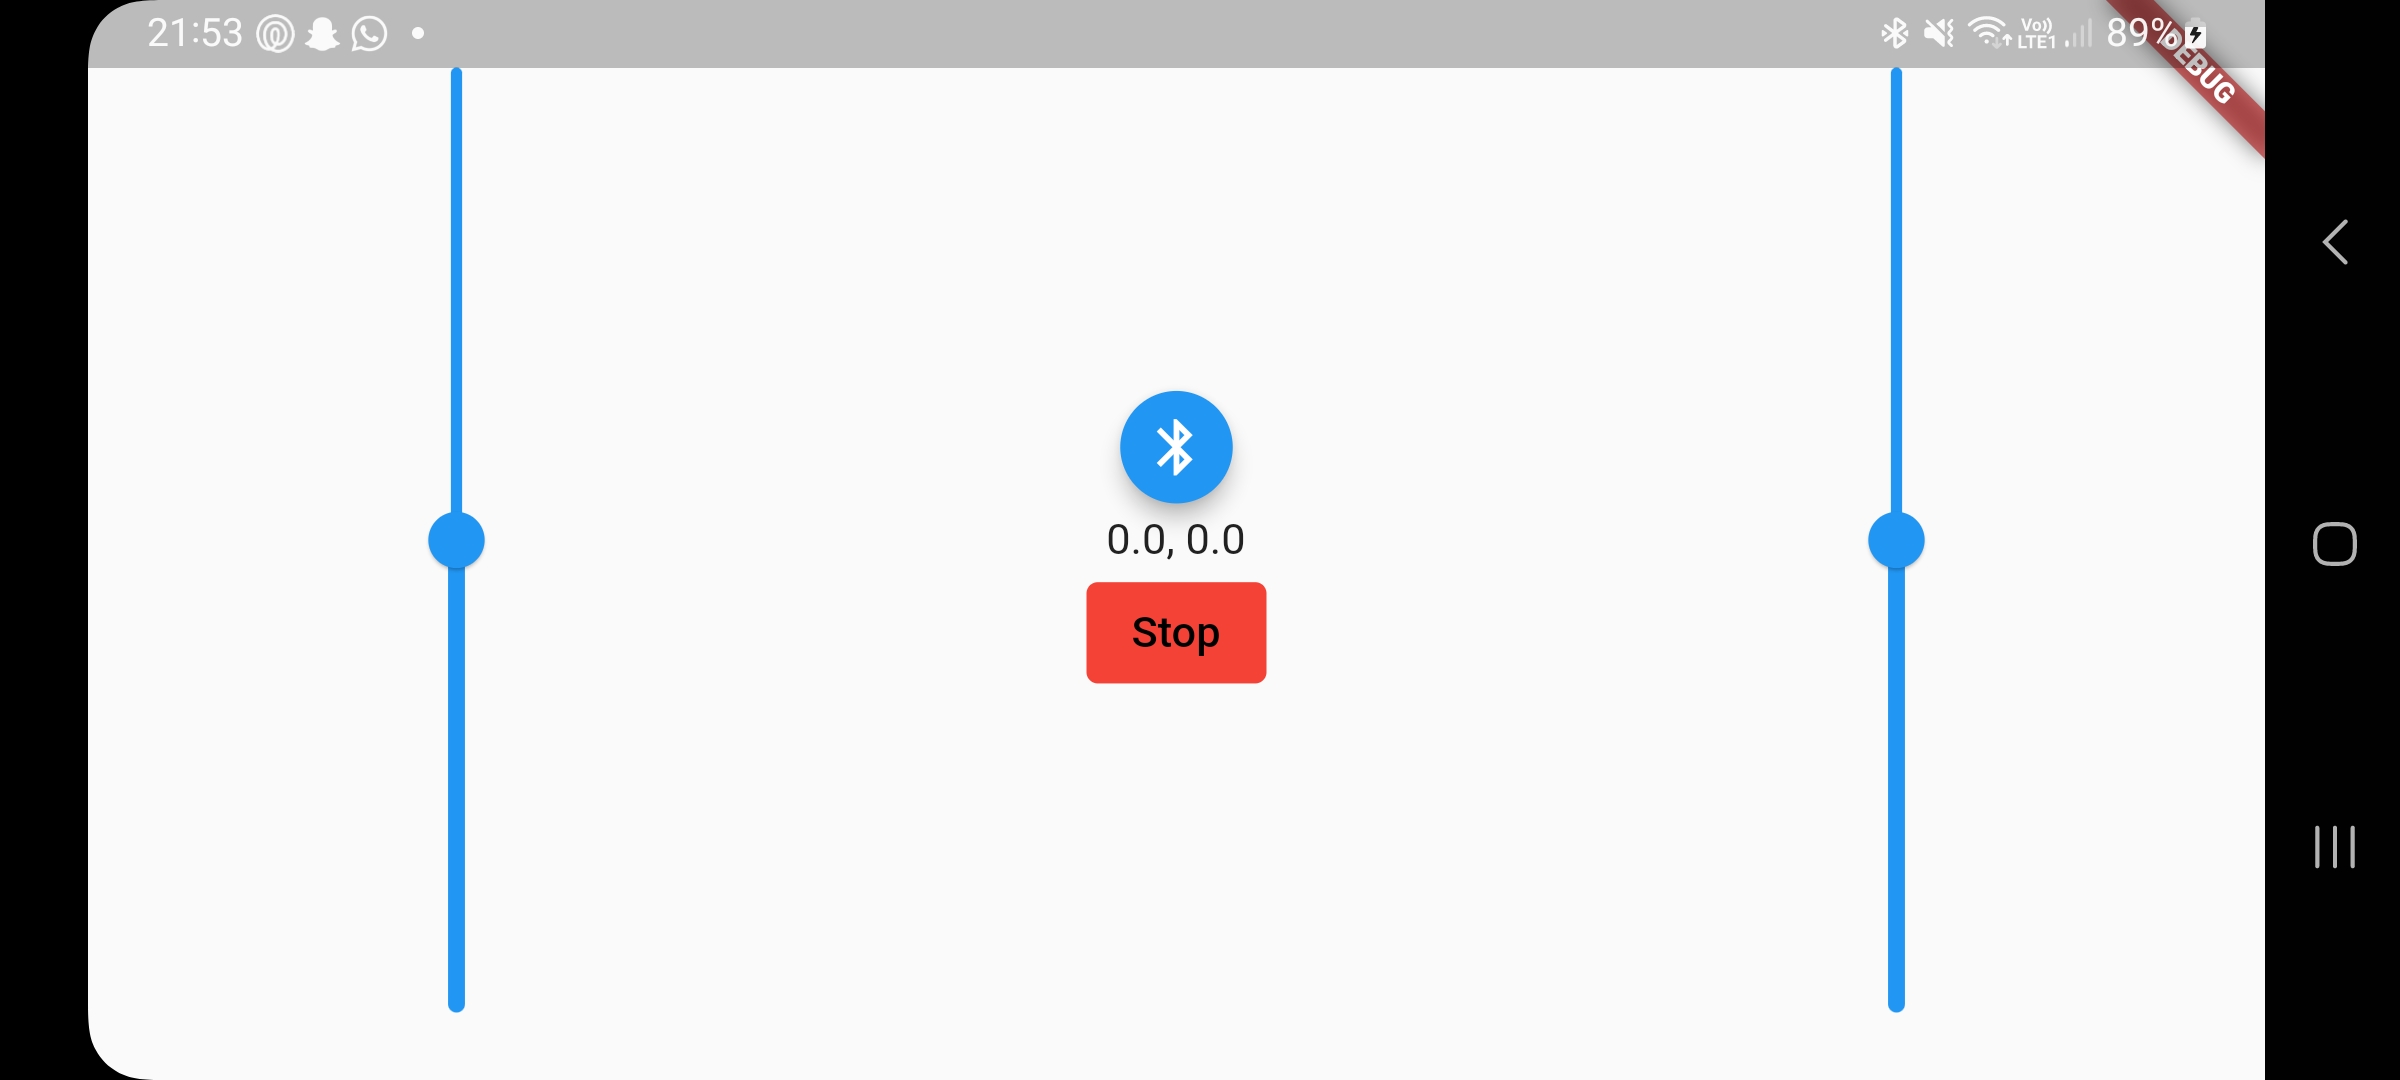
I started working on the app. I tried doing it wit Kotlin but after some trying I decided I'm going to try something different. Android studio was really slow and Kotlin was kinda complicated. I knew another language that I've tried before: Dart. Dart has the flutter framework where you can make apps really quick that you could run on Android, IOS, Widows, MacOS, Linux and on the web. Yes it is a multiplatfrom software language. I already did the setup once on my computer. I just had to update some things (which was really easy) and then I could start developing. I tried to make the app layout myself by using some help of the well documented Flutter website. The app has 2 sliders: 1 on each side to control each motor.
The next step was to make it so you could connect with bluetooth. I followed a tutorial from an Indian guy who explained how to connect to bluetooth. The nice thing about flutter is that you can use your phone as a test bench. I tried it out and... It crashed :(. It was getting pretty late so I couldn't do more testing.
The nice thing about flutter is that you have hot reload. This means that if you change something in the code, then it will be applied in the test app on your phone without having to rebuild the app and wait minutes to finish. But if the app chrashes then you have to rebuild the app constantly. This is why it took so long.
So when I was at home I tried the app again. And it worked! So why does it not work at work but it does at home. Well... That is the most interesting part. The app has a scan button, once pressed it will search for bluetooth devices. When I press the search button it shows me all available bluetooth networks in range. But my robot controller (with the bluetooth) was not plugged in and the app ran fine. When I plugged it in but it wasn't pairing (Rob installed a button that you have to press on the controller to start advertising). The moment I pressed the pair button and I scanned again on my phone the app crashed. I don't know why the bluetooth connection of the controller crashes the app. That is what we have to find out on monday!
Quick recap
I learned working with unit testing, clean code, C++ development, Flutter development, test driven development, SOLID principles, red green refactor, pair programming and agile way of working.
Over the half way mark
13/11/2023
So we confirmed that the wrong bluetooth setup on the board was indeed the reason of the crashing. I tried making it so that wouldn't happend again. This was unfortunatly not possible because it came directly from android and not from flutter. Nonetheless it worked as far as I knew. The next part was fusing the code that sends the data to the motors and the the code that porcesses the data received from the BLE.
We did some pair programming to better understand the code and the things we wrote. Rob could help me with any questions easily. He also showed me the principle of a state machine (a design pattern):
This is a way of coding and it splits the code into different parts that can switch from one part to the other. Not every part can switch to every other part and the parts may be aware of their state.
The best way of explaining is cooking fries (own example :) )
the different partshere is the schematic:
- Starting the deepfryer
- Frying Fries
- Frying frikandellen
- eating fries
- eating frikandellen
- baking more
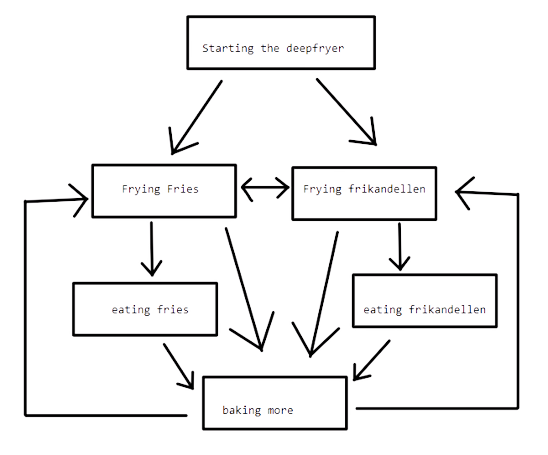
So lets say you want to eat fries. To accomplish this you first have to start the deepfryer, bake the fries and then you can eat them. You can't go directly to eating, you can't go from eating fries to eating frikandellen, you can't start the deepfryer after you fry the fries, etc...
We also used it in the program. It made the code 10 times longer but also 10 times easier to read.
Rob worked on the magic BLE stuff while I continued working on the app. It can find the ble robot and isolate it from the rest. This is easier for the user to see what to connect to
That was it for today!
Well... A longer tuesday
14/11/2023
The day started with reflecting on what we did yesterday. I showed what I did with the app at home and we tried it out. The idea I had was to isolate the BLE robot from the rest (place it on top of the rest) but Rob said: what if you have more controllers. Well... That was a good question, so I started working on that.
I spent a good part of my day on the layout of the app. But what is the app without functionality? Nothing! I had to make connection with the board using the app. This didn't worked at the start (of course!). Rob put a lot of security on the board that prevented my phone from connecting. I also did some things wrong with the code so we had to fix it.
The next task was writing data to the board. This was a complicated task. It used a whole coding of characters that I had to perfectly match to write data. After a lot of trying I made it to work. This was already after 5pm. Mike had a meeting until 6 so we had 1 hour of extra work time. The problem was that you could write data to the robot without it sending data back. This was not the default setting on the Bluetooth library in the app. It was something I had overlooked. Luckily it worked after this tiny error. We made the robot motors succesfully rotate with my phone.
I'm starting to understand Flutter! It is an amazing programming language!
Rob also tried
flutter today and made his first app.
Tomorrow I'll work on writing data with the robot control interface and tidying up the app.
Wednesday
15/11/2023
The day started with connecting the bluetooth screen to the control screen. I just finished
it in time for the daily standup (a part of the agile way of working where we talk about
what we did the previous day and what
we will do today). Almost everyone was in the office and so we gathered around a desk to
discuss. After that I went back to work.
I spent a good part of the day figuring out how
to send data with the sliders.
And after a lot of trying it finally worked. The UI lagged a lot so I had to fix that.
After fixing most of the lag if found a bug. If you swipe really fast up and let go of the slider than the slider will return to 0 (as it should) but the motor keeps spinning. I have to fix that tomorrow (I spent too much time already fixing that bug). I had a nice discussion with Mike about how I should tackle this problem.
But that is a problem for tomorrow!
First showcase of the project
16/11/2023
I had to fix the small bug. I just had to. But everything I tried didn't work. For context: the robot sometimes doesn't receive the data send from my phone. And there is a good reason for it. It has to do with the characteristics. The robot has 6 characteristics:
- speed motor left
- direction motor left
- speed motor right
- direction motor right
- stop (which I've never used)
- acknowledge (write to the phone that the data has been processed)
It can only send one thing at a time until it has received an acknowledge back. You see the
problem here? Lets say you want the robot to drive forwards: It sends "speed motor left
100%" and waits until is has been acknowledged. Then it will write "direction motor left
forwards" and waits for an acknowledge...
The same for the right motor. So it has to send
4 different messages to the robot before it can start driving. And these messages aren't
instant. So If you change something really quick then it wont register everything. And I
can't just add a waiting queue because that will stack up a lot of messages and the robot
won't react to your inputs instantly.
I tried fixing this with a lot of safety procedures. This just makes the program slow. I tried fixing this before 3pm and I made a version that was for 90% stable (if you drive careful).
Why 3pm? I had a showcase for the whole team. And even members that weren't directly part of the embeded team. Half of them followed online and the rest in the office. I told about what I had learned the past 2* weeks. I also showed them the robot with a little drive around the workfloor. They said it was impressive what I had accomplished in these 2 weeks. I will never learn the things I learned here in school and this is valueable knowledge to take with me on my career of software engeneering!
Thank you to everyone who followed my presentation!
It was also good practice because I did the whole presentation in english.
The last thing I wanted to do today was fixing the app and the robot. I had the idea to only make 2 characteristics: send data and acknowledge. In the send data characteristics I would send the speed and direction of both motors. This means it only needs 1 message to drive forward instead of 4. Rob changed the characteristics while I rebuild the app. I wanted 2 tabs in the bluetooth finder. 1 with only the robot connections and the other one with all bluetooth connections. That would be way easier for the customer to understand. I also made an info screen in case the robot wouldn't connect.
I'm still working on it! Also my teacher will visit the office tomorrow. Until then!
An emotional end
17/11/2023
Well... It was the last day already. These 2 weeks flew by. I started with implementing the redesigned characteristics and tidying up the UI. The new characteristics were a gamechanger. Way less and more stable code!
But it wasn't working great. So I was trying to make the code faster by doing some magic things when I found out that I forgot a variable. Yes the whole app was slow because of 1 variable! After this little fix the program ran sooooo smooth!
I also added some extra buttons like an info button with a user manual (I haven't wrote the user manual yet!), a button to flip your screen, a button to set the sliders from off or on to a more customizable speed, a button to switch the front and the back of the robot.
But the coolest thing was adding a gyroscope to the robot control. This means that you can steer the robot with the rotation of your phone. To implement this I had to write a whole mathematical formula (I just did something until it worked) to convert rotation of the phone an the gas that you give with 1 slider to a 2 motor driven structure. After some trail and error it drove like a charm. Rob really liked it and this was what he had in mind for the car control.
Also my teacher came to visit the office. Not to drink coffee but to evaluate my 'snuffelstage'. Rob had to evaluate how I worked these 2 weeks. He said I did very great and that makes me so happy. These 2 weeks were amazing and I'll miss this.
I want to thank everyone at Philips for this amazing experience
I want to thank Rob for being my stage mentor an helping me with everything
Thank you Rob!
I want to thank Mike for being amazing and driving me to work every day! Also for arranging this internship for me!
Thank you Mike!
And thank you to Philips for providing the Airfyer and my internship!
Thanks to everyone!
I'll keep updating the app until I'm happy! I'll also upload some photos.
This was